Canonical recently announced the release of Ubuntu 24.04 LTS, codenamed “Noble Numbat”. This update underscores Ubuntu’s ongoing commitment to enhancing performance and security, focusing on optimizing developer productivity. The latest version features an optimized Linux kernel 6.8 and significant system management upgrades as detailed in the release notes. In this blog post, we highlight the key features and improvements that Ubuntu 24.04 LTS brings to the table, specifically tailored for users of Microsoft/Azure.
Unified marketplace offering
Ubuntu 24.04 LTS introduces a consolidated Azure Marketplace experience. Easily find the official Ubuntu images created by Canonical and endorsed by Microsoft for Azure, all under a single offering: ubuntu-24_04-lts. This simplification aids your search and selection process, helping you choose the right image for your needs and ensuring optimal compatibility and performance. [Explore the Ubuntu 24.04 images on the Azure Marketplace].
Optimized for Azure
Ubuntu 24.04 LTS is finely tuned to enhance performance on Azure infrastructure, ensuring that the Ubuntu images are fully compatible and support the latest cloud features as they are released. This optimization boosts system efficiency, speed, and reliability. Integration with Azure Guest Patching and the Update Management Center facilitates streamlined and continuous system updates, thereby reinforcing the overall security and stability of Ubuntu deployments.
Enhanced developer toolchains
.NET 8 is fully compatible with Ubuntu 24.04 LTS from launch, being directly available through the official Ubuntu feeds. This synchronization with the .NET release cadence ensures developers have immediate access to the latest features and updates. Additionally, .NET 8 introduces streamlined package management and new Ubuntu container images, boosting development flexibility and deployment efficiency. (Read more in this Microsoft’s blog post).
The commitment to developer productivity also extends to other popular programming languages, including TCK-certified Java versions and the latest Rust toolchains, enhancing support and smoothing the development experience.
Confidential Computing
Ubuntu continues to lead in confidential computing with support for Confidential VMs, including capabilities for confidential AI. This is facilitated by utilizing advanced hardware security extensions such as AMD’s 4th Gen EPYC processors with SEV-SNP and NVIDIA H100 Tensor Core GPUs. These features help safeguard data at runtime from system vulnerabilities and unauthorized access, making them particularly suitable for AI training and data inference involving sensitive information.
Windows Subsystem for Linux (WSL)
Ubuntu 24.04 LTS enhances its WSL integration using the same installer technology as Ubuntu Server. This update includes support for cloud-init, standardizing developer environments across installations and ensuring consistent and streamlined workflows.
Wrapping up
As we explore the capabilities of Ubuntu 24.04 LTS, Microsoft/Azure users will experience an integration that is tailored to current technological needs and equipped for upcoming developments. This version is supported for up to 12 years, providing a stable and reliable foundation that enterprises and developers can rely on for long-term projects and innovation.
Cet article a été réalisé en collaboration avec OVHcloud
Elle est partout : dans nos mails, dans nos smartphones, dans notre vie quotidienne numérique. Et pourtant, vous ne la voyez pas. Qui ? L'intelligence artificielle bien sûr !
Cet article a été réalisé en collaboration avec OVHcloud
Il s’agit d’un contenu créé par des rédacteurs indépendants au sein de l’entité Humanoid xp. L’équipe éditoriale de Numerama n’a pas participé à sa création. Nous nous engageons auprès de nos lecteurs pour que ces contenus soient intéressants, qualitatifs et correspondent à leurs intérêts.
Cet article a été réalisé en collaboration avec OVHcloud
L’IA est partout ou presque : dans nos mails, dans nos smartphones, dans notre vie quotidienne numérique. Et c’est justement quand elle est invisible qu’elle est le plus pratique.
Cet article a été réalisé en collaboration avec OVHcloud
Il s’agit d’un contenu créé par des rédacteurs indépendants au sein de l’entité Humanoid xp. L’équipe éditoriale de Numerama n’a pas participé à sa création. Nous nous engageons auprès de nos lecteurs pour que ces contenus soient intéressants, qualitatifs et correspondent à leurs intérêts.
Le compte à rebours va bientôt s’arrêter. En décembre dernier, Lil Nas X avait disséminé dans les rues de Paris des affiches où l’on pouvait lire “Lil Nas X, il n’est pas trop tard pour être sauvé”, accompagné d’un mystérieux site internet style Skyblog, où figure le temps écoulé depuis la sortie de son premier album, Montero (945 jours au moment où nous écrivons).
Pour Lil Nas X, l’heure de la repentance est imminente avec l’arrivée d’un tout nouveau single, Lean On My Body, et de son second album, Nasarati 2 (contraction du nom de l’artiste et de Maserati, célèbre constructeur automobile italien). L’album sera sans doute la suite d’une première compilation, Nasarati, sortie en 2018 sur la plateforme Soundcloud.
Après J Christ, Light Again et Right There plus récemment, Lean On My Body s’ajoute au potentiel générique du prochain disque de Lil Nas X, dont la sortie n’a pas été encore annoncée. Bref, si vous voulez écouter du Lil Nas X, rendez-vous sur SoundCloud.
Today, Canonical is thrilled to announce our expanded collaboration with Google Cloud to provide Ubuntu images for Google Distributed Cloud. This partnership empowers Google Distributed Cloud customers with security-focused Ubuntu images, ensuring they meet the most stringent compliance standards.
Since 2021, Google Cloud, with its characteristic vision, has built a strong partnership with Canonical. This collaboration highlights both companies’ commitment to providing customers with the air-gapped cloud solutions they need. Through this partnership, Google Cloud demonstrates its strategic brilliance – delegating foundational image creation and maintenance to Canonical’s expertise, allowing Google Cloud to focus on the heart of Google Distributed Cloud development. Canonical’s dedication to rigorous testing upholds the reliability that data centers demand. Moreover, proactive support helps swiftly tackle critical issues, ensuring seamless data center operations. This partnership is a testament to the power of strategic collaborations in the tech sector:
GDC Ready OS Images: Canonical supports multiple active releases of Google Distributed Cloud (1.9.x, 1.10.x, 1.11.x, and 1.12.x) ensuring Google Cloud has flexibility and choice.
Risk Mitigation: Canonical employs a two-tiered image system–”development” and “stable.” This allows for thorough testing of changes before they are released into the stable production environment, minimizing potential problems.
These key benefits are the result of our unwavering pursuit of progress and innovation. Google Distributed Cloud customers can expect to reap the rewards of our continuous hard work:
FIPS & CIS Compliance: Google Distributed Cloud customers operating in highly regulated industries can confidently deploy FIPS-compliant and CIS-hardened Ubuntu images, knowing they adhere to critical security standards.
Multi-distro Support: Ubuntu’s adaptability allows Google Distributed Cloud users to run a diverse range of distro images, maximizing their choice and flexibility within the cloud environment.
Air-gapped Innovation: Canonical and Google Cloud are dedicated to supporting air-gapped cloud technology, providing secure, cutting-edge solutions for customers with even the most sensitive data requirements.
At Canonical, we’re committed to open-source innovation. This collaboration with Google Cloud is a prime example of how we can work together to deliver industry-leading cloud solutions to our customers. We look forward to continued partnership and providing even more value to the Google Distributed Cloud ecosystem.
One of the biggest challenges that cloud service providers (CSPs) face these days is to deliver an extension of the public cloud they host to a small-scale piece of infrastructure that runs on customers’ premises. While the world’s tech giants, such as Amazon or Azure, have developed their own solutions for this purpose, many smaller, regional CSPs rely on open source projects like OpenStack instead. However, while OpenStack is fully suitable for powering large pools of compute and storage, shrinking it down to a small box that runs on-prem, replicating the delivery process across hundreds or thousands of customers’ sites, and operating them effectively might pose an interesting challenge.
Fortunately, there are now ways to minimise OpenStack’s footprint and accelerate its delivery. In this short blog we will showcase how you can use project Sunbeam to seamlessly deploy a small-scale OpenStack cloud and plug it in as an on-prem extension of the OpenStack public cloud you host, ensuring full API compatibility and an integration with leading Cloud Platform Management (CPM) tools.
More in this series
This blog post is part of a larger series demonstrating various use cases for project Sunbeam and OpenStack. By using practical examples, we showcase how these two technologies can be used to address real-life challenges.
Before we start, let’s briefly clarify some terms that we’ll be using in this blog.
What is Sunbeam?
Sunbeam is an upstream project under the governance of the OpenInfra Foundation (OIF) created to lower the barrier to entry for OpenStack, simplify its adoption process, and set the foundation for an autonomous private cloud. Sunbeam uses cloud-native architecture and total bottom-up automation to make OpenStack more accessible to newcomers and to help users get to grips with the platform immediately.
What is MicroStack?
MicroStack (based on Sunbeam) is an OpenStack distribution designed for small-scale cloud environments. While it is available with full commercial support from Canonical, it can also be self-deployed with no friction, effectively eliminating the need for a paid consulting engagement. MicroStack currently includes core OpenStack services only but is expected to evolve quickly to ensure full feature parity with Canonical’s Charmed OpenStack soon.
OpenStack with Sunbeam as an on-prem extension of the OpenStack public cloud
Many organisations who embrace a public-cloud-only approach face a need for an on-prem infrastructure sooner rather than later. This usually stems from cost optimisation and FinOps practices, privacy concerns, or a requirement to guarantee the desired level of performance. As a result, leading public cloud providers have been already offering their own solutions in this space for years. If you are a CSP, you’ve likely heard about AWS Outposts or Azure Stack. However, finding a reasonable equivalent to those proprietary solutions in the open source space has always been a challenge.
The challenge
Most of the CSPs who offer public cloud services run OpenStack underneath them. According to the recent report by the OpenInfra Foundation, OpenStack powers more than 300 data centres that act as a regional public cloud infrastructure. This results from its unparalleled maturity, enterprise-grade stability and versatility; fourteen years after its initial release OpenStack continues to be the open source cloud platform of choice.
However, while OpenStack is fully suitable for powering those large data centres, putting it on customers’ premises might be challenging without using proper tools. This is because OpenStack is designed to deal with big clusters, rather than running on a single machine with limited hardware resources. At the same time, customers usually don’t want to over-invest: they want to start small and grow their on-prem infrastructure as they go.
Another interesting challenge is with on-going operations. OpenStack is known to be inheritably complex. Therefore, operating it in production creates significant overhead for the cloud operations team. And this is what happens when you manage just one cloud; what about if you now have to manage hundreds or thousands of clouds? The overall cost associated with running those on-prem extensions results in an ever inflating total cost of ownership (TCO).
Fortunately, dedicated tools exist to help you bypass all of these challenges.
Take a “cloud in a box” approach
With project Sunbeam CSPs can accelerate the delivery process of those on-prem extensions by taking a “cloud in a box” approach. This means shipping hardware with a super straightforward deployment procedure, or even shipping it with OpenStack pre-installed. By using cloud-native architecture underneath and running all OpenStack services inside of containers and snaps, Sunbeam effectively shrinks down the footprint of OpenStack, making it a first-class citizen on “non-beefy” machines.
The absolute minimum is just one physical node. Just note that such configuration does not ensure high availability (HA). Anyway, simply running five commands enables you to get a fully functional OpenStack up and running. This is so easy that even your non-technical customers can do it with no friction. But this is not the end! By using full automation and rich lifecycle management capabilities, Sunbeam enables the OpenStack cloud to scale out very quickly. This way your customers can always start small and grow according to their needs.
Plugging it in to your OpenStack public cloud
One of the biggest advantages of using OpenStack everywhere is that it enables you to use exactly the same cloud management software for public cloud infrastructure as well as all those extensions running on your customers’ premises. Sunbeam-based OpenStack installations rely on the pure upstream code and ensure API compatibility. Thanks to that your customers won’t see a difference when using your public cloud services or their on-prem infrastructure you provide. Exactly in the same way as Amazon customers, for example.
What’s more, you can now easily plug all those on-prem clouds to the CMP software that you use. This way you can view all the environments you manage from a single pane of glass (SPOG) dashboard. You can monitor them, check their health status, or even provision some administrative workloads centrally. This is especially useful for ongoing performance optimisation, for example, when you have to benchmark the performance of all those distributed environments.
The final challenge to address are these on-prem environments’ ongoing operations. Let’s not forget that at the end of the day those are still OpenStack clouds. As mentioned earlier, OpenStack is inheritably complex and its operations might pose a real challenge. However, project Sunbeam uses full automation: contrary to other OpenStack distributions, all typical post-deployment operations are fully automated, not just not the initial delivery phase of the project. This extensive automation also covers procedures, such as upgrades, which were historically very complicated. All of that to make OpenStack suitable for the scale we’re talking about.
Sample CPM dashboard
Conclusions
OpenStack’s architecture has always made the challenges of mass deploying it on-prem a distant bad dream. However, with project Sunbeam CSPs can finally break down these barriers. Its minimal footprint shrinks down OpenStack to a piece of software that can run inside of a single box. By ensuring full API compatibility OpenStack clouds deployed with project Sunbeam can be seamlessly plugged into the broader cloud ecosystem of the CSP. Finally, full automation used both during the initial installation and its post-deployment phase guarantees smooth delivery and frictionless operations.
Learn more about Sunbeam
Now that you’ve got a basic understanding of project Sunbeam and how it can be used for various use cases, you might be wondering where to find more information about it. If that’s the case, we have prepared some interesting follow-up materials for you:
This blog post explores the technical and strategic benefits of deploying open-source AI models on Ubuntu. We’ll highlight why it makes sense to use Ubuntu with open-source AI models, and outline the deployment process on Azure.
Authored by Gauthier Jolly, Software Engineer, CPC, and Jehudi Castro-Sierra, Public Cloud Alliance Director, both from Canonical.
Why Ubuntu for Open-Source AI?
Open Philosophy: Ubuntu’s open-source nature aligns seamlessly with the principles of open-source AI models, fostering collaboration and accessibility.
Seamless Integration: Deploying open-source AI is smooth on Ubuntu, thanks to its robust support for AI libraries and tools.
Community: Ubuntu’s large community provides valuable resources and knowledge-sharing for AI development.
The Role of Ubuntu Pro
Ubuntu Pro elevates the security and compliance aspects of deploying AI models, offering extended security maintenance, comprehensive patching, and automated compliance features that are vital for enterprise-grade applications. Its integration with Confidential VMs on Azure enhances the protection of sensitive data and model integrity, making it an indispensable tool for tasks requiring stringent security measures like ML training, inference, and confidential multi-party data analytics.
Why use the public cloud for deploying AI models?
Using a public cloud like Azure gives straightforward access to powerful GPUs and Confidential Compute capabilities, essential for intensive AI tasks. These features significantly reduce the time and complexity involved in setting up and running AI models, without compromising on security and privacy. Although some may opt for on-prem deployment due to specific requirements, Azure’s scalable and secure environment offers a compelling argument for cloud-based deployments.
Provisioning and Configuration
We are going to explore using open models on Azure by creating an instance with Ubuntu, installing NVIDIA drivers for GPU support, and setting up Ollama for running the models. The process is technical, involving CLI commands for creating the resource group, VM, and configuring NVIDIA drivers. Ollama, the chosen tool for running models like Mixtral, is best installed using Snap for a hassle-free experience, encapsulating dependencies and simplifying updates.
Provision an Azure VM
Begin by creating a resource group and then a VM with the Ubuntu image using the Azure CLI.
az group create --location westus --resource-group ml-workload
az vm create \
    --resource-group ml-workload \
    --name jammy \
    --image Ubuntu2204 \
    --generate-ssh-keys \
    --size Standard_NC4as_T4_v3 \
    --admin-username ubuntu --license-type UBUNTU_PRO
Note the publicIpAddress from the output – you’ll need it to SSH into the VM.
Install Nvidia Drivers (GPU Support)
For GPU capabilities, install NVIDIA drivers using Ubuntu’s package management system. Restart the system after installation.
Important: Standard NVIDIA drivers don’t support vGPUs (fractional GPUs). See instructions on the Azure site for installing GRID drivers, which might involve building an unsigned kernel module (which may be incompatible with Secure Boot).
Deploying Ollama with Snap
Snap simplifies the installation of Ollama and its dependencies, ensuring compatibility and streamlined updates. The –beta flag allows you to access the latest features and versions, which might still be under development
sudo snap install --beta ollama
Configuration
Configure Ollama to use the ephemeral disk
sudo mkdir /mnt/models
sudo snap connect ollama:removable-media # to allow the snap to reach /mnt
sudo snap set ollama models=/mnt/models
Installing Mixtral
At this point, you can run one of the open models available out of the box, like mixtral or llama2. If you have a fine-tuned version of these models (a process that involves further training on a specific dataset), you can run those as well.
ollama run mixtral
The first run might take a while to download the model.
Now you can use the model through the console interface:
Installing a UI
This step is optional, but provides a UI via your web browser.
sudo snap install --beta open-webui
Access the web UI securely
To quickly access the UI without open ports in the Azure security group, you can create an SSH tunnel to your VM using the following command:
ssh -L 8080:localhost:8080 ubuntu@${IP_ADDR}
Go to http://localhost:8080 in your web browser on your local machine (the command above tunnels the traffic from your localhost to the instance on Azure).:
In case you want to make this service public, follow this documentation.
Verify GPU usage
sudo watch -n2 nvidia-smi
Check that the ollama process is using the GPU, you should see something like this:
+---------------------------------------------------------------------------+
| Processes:                                                                |
|  GPU   GI   CI        PID   Type   Process name                GPU Memory |
|        ID   ID                                                 Usage      |
|===========================================================================|
|    0   N/A  N/A      1063      C   /snap/ollama/13/bin/ollama     4882MiB |
+---------------------------------------------------------------------------+
Complementary and Alternative Solutions
Charmed Kubeflow: Explore this solution for end-to-end MLOps (Machine Learning Operations), providing a streamlined platform to manage every stage of the machine learning lifecycle. It’s particularly well-suited for complex or large-scale AI deployments.
Azure AI Studio: Provides ease of use for those seeking less customization.
Conclusion
Ubuntu’s open-source foundation and robust ecosystem make it a compelling choice for deploying open-source AI models. When combined with Azure’s GPU capabilities and Confidential Compute features, you gain a flexible, secure, and performant AI solution.
Google Next is making its way to Las Vegas, and Ubuntu is joining the journey. As a proud sponsor, Canonical, the publisher of Ubuntu , invites you to join us at the event and visit booth #252 in the Mandalay Bay Expo Hall. As one of the most popular Linux operating systems, Canonical is dedicated to providing commercial support and driving open source innovation across a diverse range of industries and applications. Stop by and learn more about how Canonical and GCP are collaborating to empower businesses with secure and scalable solutions for their cloud computing needs.
Ubuntu ‘Show you’re a Pro’ Challenge: Find and patch the vulnerabilities and earn awesome swag!
Are you an Ubuntu Pro? Test your skills at our booth! Sit down at our workstation and discover any unpatched vulnerabilities on the machine. Showcase your expertise by securing the system completely, and receive exclusive swag as a token of our gratitude.
Security maintenance for your full software stack
At Canonical, security is paramount. Ubuntu Pro offers a solution to offload security and compliance concerns for your open source stack, allowing you to concentrate on building and managing your business. Serving as an additional layer of services atop every Ubuntu LTS release, Ubuntu Pro ensures robust protection for your entire software stack, encompassing over 30,000 open source packages. Say farewell to fragmented security measures; Canonical provides a holistic approach, delivering security and support through a unified vendor. Additionally, relish the assurance of vendor-backed SLA support for open source software, providing peace of mind for your operations.
Confidential computing across clouds
Confidential computing is a revolutionary technology that disrupts the conventional threat model of public clouds. In the past, vulnerabilities within the extensive codebase of the cloud’s privileged system software, including the operating system and hypervisor, posed a constant risk to the confidentiality and integrity of code and data in operation. Likewise, unauthorized access by a cloud administrator could compromise the security of your virtual machine (VM).
Ubuntu Confidential VMs (CVMs) on Google Cloud offer enhanced security for your workloads by utilizing hardware-protected Trusted Execution Environments (TEEs). With the broadest range of CVMs available, Ubuntu enables users on Google Cloud to benefit from the cutting-edge security features of AMD 4th Gen EPYC processors with SEV-SNP and Intel Trust Domain Extensions (Intel TDX).
Scale your AI projects with open source tooling
Empower your organization with Canonical’s AI solutions. We specialize in the automation of machine learning workloads on any environment, whether private or public cloud, or hybrid or multi cloud. We provide an end-to-end MLOps solution to develop and deploy models in a secure, reproducible, and portable manner that seamlessly integrates with your existing technology stack. Let us help you unlock the full potential of AI.
Join Us at Google Next 2024
Mark your calendars and make plans to visit Canonical at Google Cloud Next 2024. Whether you’re seeking cutting-edge solutions for cloud computing, robust security measures for your software stack, or innovative AI tools to propel your organization forward, our team will be on hand to offer insights, demonstrations, and personalized consultations to help you harness the power of open source technology for your business. Join us at booth #252 to discover how Canonical and Ubuntu can elevate your digital journey. See you there!
Prompts:
Canonical at Google Next – What you need to know!
Canonical is excited to sponsor Google Cloud Next in Las Vegas, NV April 9-11, 2024.
visit to the Canonical-Ubuntu booth #252 in the Mandalay Bay Expo Hall.
Our team will be available to discuss the following:
Protect your full software tech stack with Ubuntu Pro providing security coverage for 30,000+ software packages.
Single vendor for security requirements – delivery, security, support; Vendor-backed SLA support for open source
Confidential computing – OS support across all clouds (multi-cloud/hybrid cloud)
AI
Canonical provides tailored solutions to enable your organisation to efficiently run machine learning workloads. Canonical offers an end-to-end MLOps solution that can be used across all layers of the technology stack.
While at our booth, earn some awesome swag by showing that you’re an Ubuntu Pro. Take a seat at our workstation to find the unpatched vulnerabilities on the machine! Upgrade the machine to be fully secure to earn awesome swag!
Telecommunications companies (telcos) are well on their way to transforming their infrastructure from the legacy, unadaptable, complex network of dedicated hardware from yesteryears to agile, modular and scalable software-defined systems running on common off-the-shelf (COTS) servers.
Within this space, the current trend, driven by 5G deployments, is to complement tried and tested network function virtualisation (NFV) infrastructure with cloud-native network functions (CNFs). This refers to the cloud-native approach of building, deploying and managing telco functions and applications as a mesh of micro services packaged as containers.
A telco cloud is a highly robust and dynamic infrastructure built using cloud-native technologies designed specifically for communication services providers (CSPs) to deliver agile, flexible and efficient telecom services. It combines various components like software-defined networking (SDN), orchestration tools and other cloud computing technologies to enable the creation, customisation, and management of network services in a more cost-effective, scalable, and automated manner compared to traditional telecom architectures. It empowers telcos to reduce their innovations’ time to market, to react more quickly to shifts in network requirements and to improve their operational efficiency. A telco cloud provides the foundation for next-generation communication services, including 5G stand-alone (5G SA) networks and various Internet of Things (IoT) applications.
How does a telco cloud address telco challenges?
In order to stay innovative and competitive, telcos need ever more agility. They need to respond quickly to shifting market dynamics, evolving customer demands and emerging technologies. They require flexibility, modularity and freedom to customise solutions to keep up with the evolution of the industry. These are all areas in which a telco cloud can help.
Innovate and customise
With cloud-native application development techniques, telcos can leverage a telco cloud to bring new 5G revenue streams, internally developed or externally acquired from new tech and start-ups with a higher risk appetite than service providers.
They can reduce the time to develop, build and deploy new services and features to specific customer segments. This enables bringing solutions targeting new markets, such as industry monitoring, smart cities, smart homes, connected cars and fleet management.
These solutions can be tailored to specific customers quickly and economically thanks to the agility, modularity and flexibility of cloud-native software development.
Similarly, these technologies allow telcos to build platforms which can ignite collaboration and provide support to innovative third party developers. This can enable the creation of value in the telco’s core competencies, including connectivity and operational excellence, while reducing risks associated with the process of experimentation.
Increase power efficiency
Energy expenses currently comprise between 15% and 40% of telcos’ operating costs. They are all actively looking for ways to reduce their energy consumption through energy-efficient technology, renewable energy sources, and improved operational efficiency.
By virtualizing network functions and consolidating multiple workloads on a shared infrastructure, a telco cloud reduces the overall number of physical servers and corresponding power requirements. With intelligent load-balancing techniques, a telco cloud ensures optimal resource utilisation across the network, minimising idle resources and reducing the need for excess capacity, which in turn decreases power consumption.
The use of specific analytics coupled with automation can be beneficial to optimise the power consumption of telco workloads. Underutilised wasteful infrastructure can be identified and massive power savings can be achieved with the right optimisation approach while maintaining network performance and service levels. A telco cloud offers the flexibility to scale resources up or down according to demand, ensuring that only the necessary compute, storage and network capacity is being used. The high availability and fault tolerance features of a telco cloud ensure minimal downtime and prevent overloading of resources, thereby optimising energy consumption by reducing the need for redundant equipment or backup systems.
Improve customer loyalty
Telcos are facing heightened competition and shifting consumer behaviours, necessitating creative approaches to increase revenue and maintain customer expansion. One way is to bundle and aggregate popular streaming services by partnering with content platforms.
A telco cloud enables the integration – from delivery to billing – of various digital services, such as over-the-top (OTT) media content distribution, to significantly enhance the telco customer experience.
Using AI-powered tools, telcos are also able to grow their revenues by predicting and preventing subscriber churn. A telco cloud delivers more agile cloud-centric monetisation platforms providing more insights to power the new generation of services.
Reduce costs
A telco cloud, when run at scale, reduces the capital expenditure required to support network infrastructure by enabling companies to utilise COTS hardware and pay only for the capacity they need, adjusting with usage changes, while leveraging the hybrid cloud.
This shift to operational expenditure is covered by the accompanying process automation enabled by Telco Cloud best practices and cloud-native application development methodologies, such as DevSecOps and CI/CD.
The highly resilient and automated architecture of the Telco Cloud also improves service availability and reduces the time to respond to faults and demand fluctuations.
What are the technical requirements for a telco cloud?
There are significant differences between your general purpose cloud environment and that of a telco cloud. With the exception of mission-critical applications, enterprise cloud deployments can tolerate less tight availability and performance requirements than those of telco network functions.
Some functions, such as the 5G Radio Access Network (RAN), need to perform in real-time at the edge of the network, as close to the user equipment as possible, with the best throughput and latency. The five nines availability goal, a downtime of no more than 5.26 minutes per year, is also a given.
A telco cloud encompasses not only the telco central offices and edge locations, but also data centres spread across the network reach. It delivers its network functions and other workloads wherever they can be run in order to optimise efficiency and quality of experience.
Carrier-grade network requirements initially prevented moving network functions to the public cloud. With the improvement of multi cloud and hybrid cloud connectivity, more and more telcos are leveraging public cloud infrastructure for some of their telco cloud network functions. One significant advantage of the container technology used in cloud-native architecture is its portability. The microservices realising a network function and its dependencies are encapsulated in a single, self-contained unit that can run on any system that supports the container format.
One of the key conditions in achieving a successful implementation of a telco cloud is the need for business continuity and coexistence of cloud-native with existing legacy infrastructure. During a telco cloud deployment, companies need to be able to seamlessly migrate existing network services and applications in a coordinated manner. A good way to approach this challenge is to consider not only the infrastructure and product portfolio but also the organisation and its processes.
As with any project, there are several factors to evaluate when deploying a telco cloud:
Whether to buy a complete solution or to do everything or part of it internally, with or without external support from a systems integrator.
What amount should be invested upfront?
How much risk is acceptable?
What is the target time-to-market?
How will success be defined and measured?
Some of the key decisions that telcos need to make include:
Identifying the telco cloud services that need to redeveloped as microservices instead of migrated virtual machines (VMs).
Selecting the right management and orchestration tools to support the efficient and effective automation of a telco cloud.
Defining the rules that drive the hybrid cloud approach, depending on the economics, operational expertise and time-to-market requirements.
Partnering and collaborating with technology companies, startups, and other organisations. This can help to access new technologies, markets, and expertise, and accelerate time-to-market
The path to a successful telco cloud deployment can be long and difficult but it is one of the key milestones for a telco to achieve its transition into a “techco” (technology-driven company) equipped to face competition from tech giants, media conglomerates and startups.
How can Canonical help you deploy a telco cloud?
In order to deploy a telco cloud effectively, companies need the tools that can support all their critical workloads wherever they run them, and enable them to incorporate innovators into the CSP network.
Canonical brings the power of open source cloud-native technologies to the telco industry. A member of key telecommunications initiatives (such as the Open Networking Foundation, where we contribute to the Aether project, the OpenAirInterface Software Alliance, the Sylva project, and ETSI), Canonical provides cloud platforms that support the deployment and operation of certified virtual and container network functions both for the 5G Core and RAN. We are a proven, trusted technology partner in the ecosystem, with years of experience in telco operations across the globe.
Canonical maintains a strong security posture by ensuring all published open source software is hardened, audited and certified to adhere to industry standards. This commitment extends to reducing the footprint of the OS and containers to minimise the attack surface.
This specific innovation also translates into efficiency gains that are significant in large-scale RAN deployments involving tens or even hundreds of thousands of nodes.
Furthermore, Canonical’s robust automation tooling and 12 years long term support (LTS) not only streamline day 2 operations but also contribute to a competitive TCO making canonical the most economical vendor in the market.
Global top-tier operators endorse Canonical solutions for telcos. Our solutions encompass core, RAN and edge use cases and provide essential Enhanced Platform Awareness capabilities such as affinity and anti-affinity rules, CPU pinning, DPDK, Huge Pages, SR-IOV and secondary vNIC access, among others.
Groundwork starts with our tight partnerships with silicon vendors and independent hardware vendors that ensure Canonical provides the best silicon enablement and support for innovative technologies and acceleration capabilities.
Lastly, Canonical’s simple and unique Ubuntu Pro subscription offers the most comprehensive long term support, security and compliance for all your open source software. Using Canonical solutions, companies can operate carrier-grade cloud-native Telco Clouds at scale.
Since the outset, Anbox Cloud was developed with a variety of use cases for running Android at scale. Cloud gaming, more specifically for casual games as found on most user’s mobile devices, is the most prominent one and growing in popularity. Enterprises are challenged to find a solution that can keep up with the increasing user demand, provide a rich experience and keep costs affordable while shortening the time to market.
Anbox Cloud brings Android from mobile devices to the cloud. This enables service providers to deliver a large and existing ecosystem of games to more users, regardless of their device or operating system. Existing games can be moved to Anbox Cloud with zero to minimal effort.
Canonical has built Anbox Cloud upon existing technologies that allow for a higher container density compared to traditional approaches, which helps to reduce the overall cost of building and operating a game streaming service. The cost structure of a casual game, based in the cloud, also shows that density is key for profitability margins. To achieve density optimisation, three factors must be considered: container density (CPU load, memory capacity and GPU capacity), profitability and user experience optimisation. Additional considerations include choosing the right hardware to match the target workload, intended rendering performance and the pricing sensitivity of gamers. Finding the optimal combination for these factors and adding a layer of automation is crucial to improve profitability margins and to meet SLAs.
To further address specific challenges in cloud gaming, Canonical collaborates with key silicon and cloud partners to build optimised hardware and cloud instance types. Cloud gaming has a high demand on various hardware components, specifically GPUs which provide the underlying foundation for every video streaming solution. Utilising the available hardware with the highest density for cost savings, requires optimisation on every layer. Anbox Cloud specifically helps to get the maximum out of the available hardware capacity. It keeps track of resources spent by all launched containers and optimises placement of new containers based on available capacity and resource requirements of specific containers.
Next to finding the right software and hardware platform, cloud gaming mandates positioning the actual workload as close to the user as possible to reduce latency and ensure a consistent experience. To scale across different geographical regions, Anbox Cloud provides operational tooling and software components to simplify the deployment without manual overhead and ensures users get automatically routed to their nearest location. By plugging individual regions dynamically into a control plane allows new regions to be easily added on the go without any downtime or manual intervention.
Anbox Cloud builds a high-density and easy-to-manage containerisation platform on top of the LXD container hypervisor which helps to minimise the time to market and reduce overall costs. It reflects Canonical’s deep expertise in cloud-native applications and minimises operational overhead in multiple ways. With the use of existing technologies from Canonical like Juju or MAAS, it provides a solid and proven platform which is easy to deploy and maintain. Combined with the Ubuntu Pro support program from Canonical, an enterprise can ensure it gets long-term help whenever needed.
As differentiation is key in building a successful cloud gaming platform, Anbox Cloud provides a solid foundation which is extensible and fits into many different use cases. For example, integrating a custom streaming protocol is possible by writing a plug-in and integrating it via provided customising hooks into the containers which power Anbox Cloud. To make this process easy, Canonical provides an SDK, rich documentation with example plugins and engineering services to help with any development around Anbox Cloud.
In summary, Anbox Cloud provides a feature rich, generic and solid foundation to build a state of the art cloud gaming service which provides optimal utilisation of the underlying hardware to deliver the best user experience while keeping operational costs low.
If you’re interested to learn more, please come and talk to us.
Android is a trademark of Google LLC. Anbox Cloud uses assets available through the Android Open Source Project.
À la mi-janvier 2024, Google avait pris la décision de supprimer les frais de sortie pour les clients de ses services Cloud offerts via Google Cloud Platform. Désormais, c'est au tour de Microsoft d'adopter une politique similaire pour son Cloud Azure. Faisons le point sur cette annonce !
Sur son site dédié aux mises à jour de services Azure, Microsoft a "discrètement" mis en ligne un court message, qui pourtant contient une information cruciale : la fin des frais de sortie pour les utilisateurs qui souhaitent migrer leurs données présentes sur Azure vers un autre fournisseur Cloud. Une décision qui va dans le sens de la décision prise par Google en janvier 2024, suivi par Amazon Web Services en février 2024 : il ne manquait plus que Microsoft pour compléter ce trio américain.
À l'instar de Google, Microsoft est clair : si vous partez, et que vous souhaitez partir gratuitement, vous devez migrer l'intégralité de vos services et arrêtez d'utiliser les services Azure, en clôturant votre compte. Autrement dit, si vous sortez du Cloud Azure uniquement une partie de vos services, vous ne pourrez pas bénéficier de cette gratuité.
L'entreprise américaine précise : "Le support Azure appliquera le crédit lorsque le processus de transfert des données sera terminé et que tous les abonnements Azure associés au compte auront été annulés." - À l'inverse, Amazon avec son Cloud AWS n'impose pas la fermeture du compte.
Microsoft en profite pour rappeler qu'il y a déjà une gratuité, partielle, pour quitter Azure : "Azure offre déjà les premiers 100 Go/mois de données transférées gratuitement à tous les clients dans toutes les régions Azure du monde."
Si Microsoft, Google et Amazon ont pris une telle décision, ce n'est probablement pas par plaisir ni par générosité, mais certainement pour se mettre en conformité avec un nouveau texte européen qui doit entrer en vigueur en septembre 2025 : le Data Act. Ceci est d'autant plus vrai que le Digital Markets Act est entré en vigueur récemment, et qu'il contient aussi des directives qui vont en ce sens. Ceci est une première étape pour offrir plus de liberté et de souplesse aux clients d'Azure.
Dans cet article, nous allons partir à la découverte de l'offre Public Cloud de l'hébergeur suisse Infomaniak. Ce sera l'occasion de vous présenter le tableau de bord et l'interface de gestion avant de vous expliquer comment déployer une instance Windows Server 2022 en quelques minutes.
Avant d'entrer dans le vif du sujet, il me semble important de vous présenter l'hébergeur Infomaniak, ainsi que ses valeurs. Créé en 1994, en Suisse, ce fournisseur Cloud propose une large gamme de services : hébergement web, hébergement WordPress, serveur VPS, infrastructure Public Cloud, housing, etc.... Sans oublier la solution collaborative éthique kSuite qui regroupe des fonctions de stockage en ligne de type Drive, un système de visioconférence, de messagerie électronique, de chat, etc. Dernièrement, Infomaniak a lancé sa propre intelligence artificielle souveraine accessible au travers d'une API.
Aujourd'hui, Infomaniak compte plus d'un million d'utilisateurs et plus de 200 collaborateurs.
Au cœur des priorités d'Infomaniak, il y a la sécurité des données, le respect de la vie privée et l'écologie. L'intégralité des données des clients sont stockées dans des centres de données (Tier 3+) conçus par Infomaniak et situés en Suisse. Ceci est en adéquation avec la volonté d'Infomaniak de proposer des solutions souveraines et adaptées aux données sensibles.
Sur le plan de son empreinte écologique, le fournisseur cloud suisse effectue un travail remarquable depuis 2007 ! Le Green IT est dans l'ADN d'Infomaniak : au-delà de réduire sa consommation en énergie, l'hébergeur utilise exclusivement de l’énergie renouvelable, construit ses propres centrales solaires et prolonge la durée de vie de ses serveurs jusqu’à 15 ans pour limiter son impact au maximum sur la Planète. De plus, Infomaniak ne climatise plus ses data centers depuis 2013, compense à 200% la totalité de ses émissions de CO2, et va encore plus loin avec son nouveau data center D4.
Comme l'explique cet article, ce data center n’a aucun impact sur le paysage, car il est construit sous le parc d’un écoquartier. Son originalité ? Il revalorisera 100% de l'énergie consommée par l'infrastructure et la chaleur dégagée sera utilisée pour le chauffage de milliers de ménages en hiver et pour chauffer l'eau des sanitaires en été. "Cette innovation fournira à pleine capacité 12 750 MWh soit l’équivalent de 5500 tCO2 de pellets par an pour chauffer jusqu’à 6000 ménages", peut-on lire sur le site officiel.
Le Cloud Public Infomaniak correspond à une offre de service de type IaaS où vous pouvez déployer l'infrastructure correspondant à vos besoins et ceux de votre organisation : instance serveurs (CPU/GPU), object storage (compatible S3), stockage bloc (Ceph/Cinder), réseau haute performance, etc.
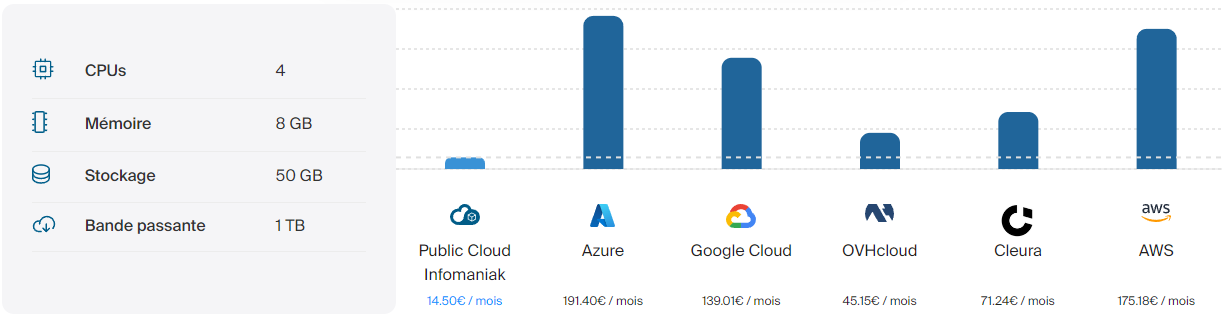
Ce qui est intéressant, c'est qu'en plus d'être une solution européenne et souveraine, les services d'Infomaniak sont moins coûteux en comparaison de ceux proposés par les géants américains : Microsoft Azure, Amazon Web Services (AWS) et Google Cloud Platform. Consultez cette page pour en savoir plus.
Voici un exemple fournit par Infomaniak :
Un calculateur en ligne vous permet d'estimer votre consommation, ce qui peut être un exercice intéressant, notamment si vous avez déjà des services chez un autre fournisseur.
Tous les tarifs par heure ou par mois sont disponibles sur cette page :
D'un point de vue technique, le Cloud Public d'Infomaniak s'appuie sur la technologie de Cloud computing open source OpenStack. Il s'agit d'une solution populaire reconnue dans le monde entier et utilisée par des centaines de fournisseurs Cloud, ainsi que des organisations. OpenStack peut être utilisé sur une infrastructure locale, hybride ou entièrement Cloud.
Grâce à une API et au fait qu'OpenStack soit une technologie ouverte, vous pouvez utiliser d'autres outils populaires pour gérer et déployer votre infrastructure : Terraform, Ansible, Docker, Kubernetes, etc....
Lors du déploiement d'une instance de type "serveur virtuel" sur le Cloud Public d'Infomaniak, vous avez le choix entre plusieurs images prêtes à l'emploi, aussi bien en Linux (Debian, Ubuntu, Oracle Linux, Arch Linux, Alpine Linux, Red Hat Enterprise Linux, etc.) qu'en Windows Server avec une prise en charge de Windows Server 2019 et Windows Server 2022.
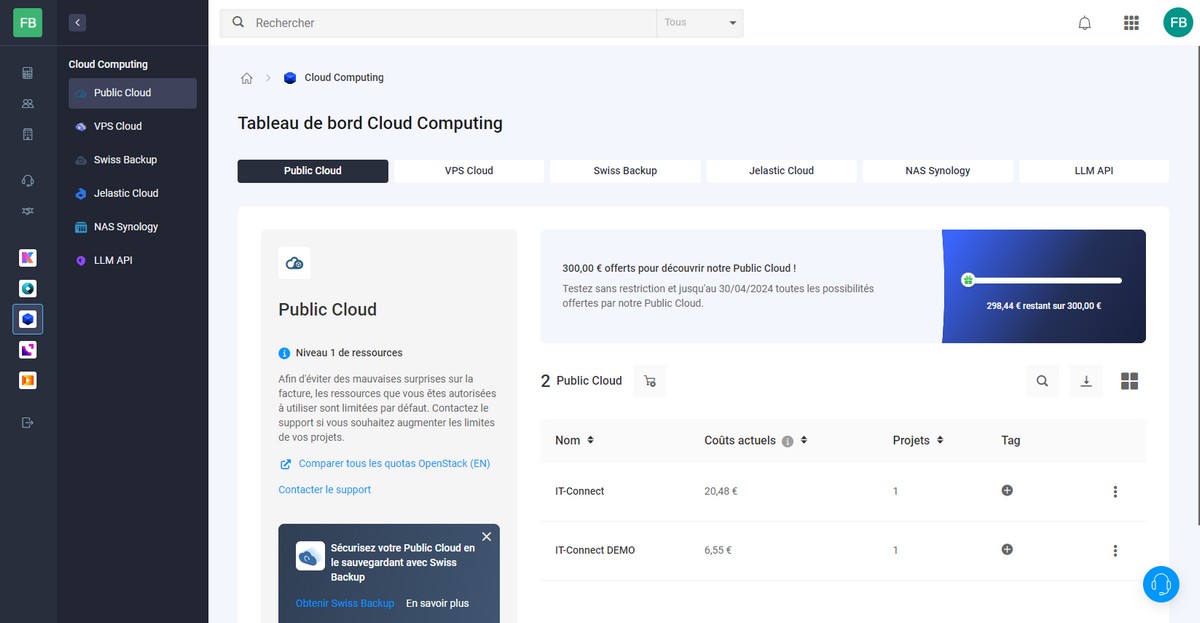
La gestion de ses projets Public Cloud s'effectue à partir de l'interface Manager d'Infomaniak, où vous pouvez retrouver l'ensemble de vos services. Chaque "tenant" Public Cloud est associé à un ou plusieurs projets, où chaque projet à ses ressources, ses utilisateurs, etc... Ce cloisonnement est intéressant pour effectuer une séparation par projets ou par clients selon nos besoins.
A. Créer un projet
La première étape consiste à créer un nouvel environnement avec un projet. Ceci va permettre d'avoir un accès à OpenStack avec un utilisateur dédié. Cette étape s'effectue facilement. Il suffit de se laisser guider par l'assistant.
Envie de tester le Cloud Public Infomaniak ? Vous pouvez utiliser ce lien.
Une fois cette première étape complétée, nous devons nous connecter à l'interface d'OpenStack à l'aide de notre nouvel utilisateur.
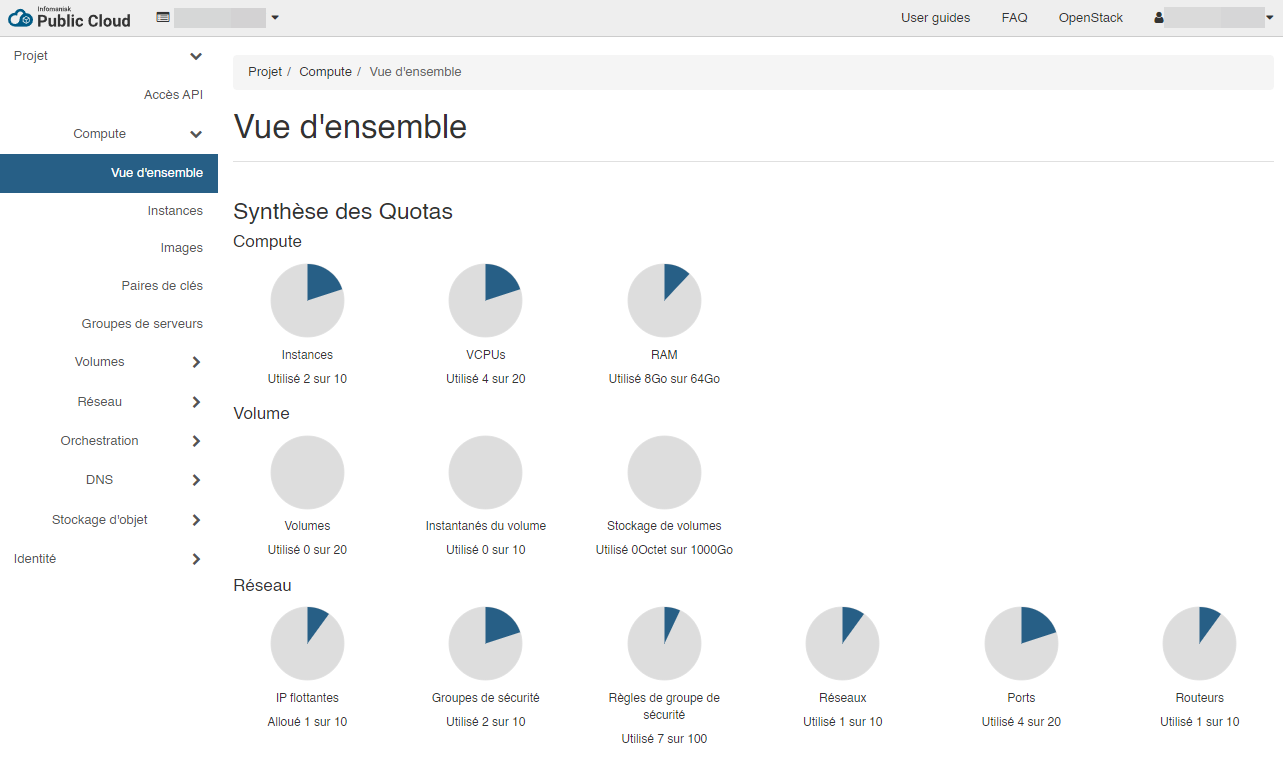
Voilà, nous sommes sur l'interface OpenStack !
C'est ici, que nous allons pouvoir créer nos instances, c'est-à-dire nos serveurs virtuels, mais également configurer les réseaux, le stockage, etc... En effet, nous pouvons créer un ensemble de réseaux virtuels, connectés ou non à Internet, de routeurs pour assurer les communications entre nos réseaux et les communications entre ces réseaux est sécurisé grâce à des groupes de sécurité (security groups).
B. Le coût d'une instance Windows Server
Comme je l'évoquais précédemment, vous pouvez déployer différents systèmes d'exploitation sur vos instances. Si vous choisissez d'utiliser Windows Server, au-delà du coût de l'instance, vous devez aussi louer la licence Windows Server. Ceci est proposé directement par Infomaniak, vous n'avez pas besoin d'apporter votre propre licence.
Actuellement, le tarif est le même pour toutes les versions et éditions de Windows Server. Il s'agit d'un tarif par CPU. Voici, à titre d'exemple, un tableau extrait du site Infomaniak :
IV. Déployer une infrastructure Windows Server
A. Schéma de l'infrastructure cible
Avant de vous expliquer comment utiliser l'interface d'OpenStack, nous allons nous intéresser à notre infrastructure cible. Elle contiendra une seule instance, sous Windows Server, mais nous allons effectuer toute la configuration du réseau virtuel afin de mettre en pratique la création d'un réseau, d'un sous-réseau, d'un port, d'un routeur ou encore d'un groupe de sécurité, en plus de l'instance en elle-même. Ceci vous permettra d'être plus à l'aise et plus ambitieux par la suite.
En résumé, nous allons accomplir les actions suivantes :
Création d’un réseau nommé "servers-net" et d’un sous-réseau nommé "servers-net-windows" (10.10.10.0/24), avec DHCP activé, et une adresse IP de passerelle définie
Création d’un port sur ce réseau, avec une adresse IP statique (pour qu’elle soit attribuée à la future instance) – 10.10.10.2/24
Création d’un routeur connecté au réseau "ext-floating1" pour avoir accès à Internet et avec l'adresse IP "10.10.10.1/24" pour la communication avec notre sous-réseau
Ajout d’une interface sur le routeur pour faire le lien avec le sous-réseau précédemment créé
Création d’un groupe de sécurité et ajout d’une règle pour autoriser le protocole RDP (Bureau à distance)
Ajout d’une adresse IP flottante pour la rattacher au port créé sur le réseau (avec l'adresse IP 10.10.10.2/24)
Création d’une instance Windows Server
Connexion à l'instance Windows Server, via RDP
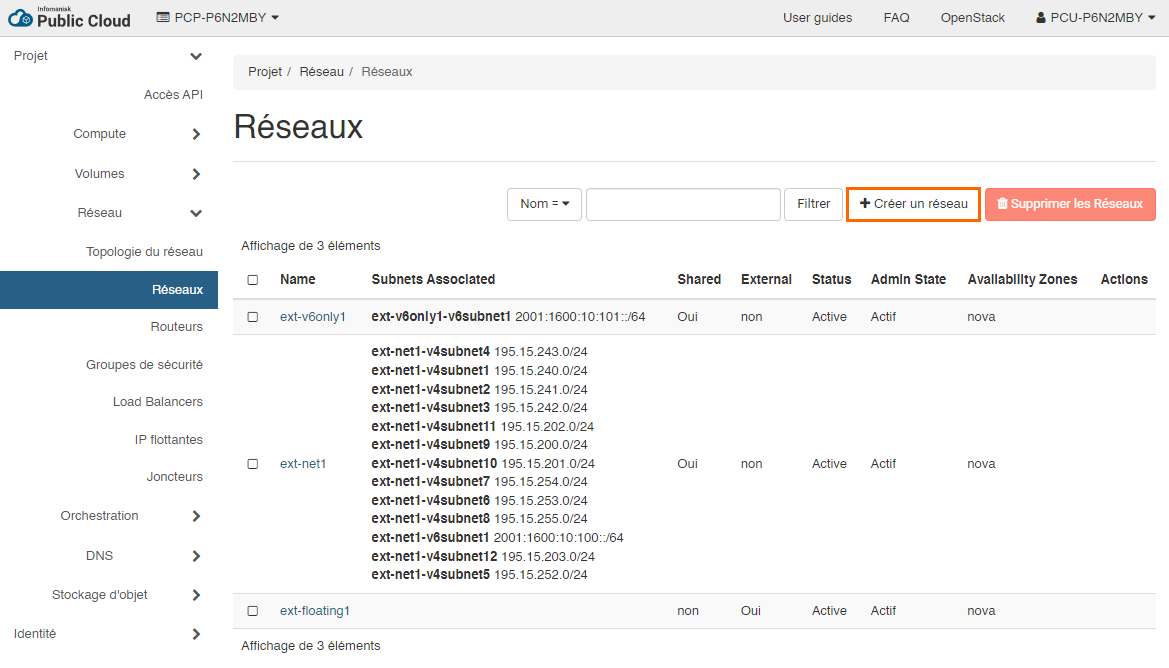
B. OpenStack : créer un réseau
Commençons par la préparation de l'infrastructure réseau virtuelle. La première étape consiste à créer un réseau puis un sous-réseau. Sous "Réseau", cliquez sur "Réseaux" puis sur "Créer un réseau". Il est à noter que nous pourrions directement connecter notre instance sur le réseau "ext-net1" mis à disposition par Infomaniak. Pour plus de contrôle et de souplesse, nous allons créer notre propre réseau.
Vous devez commencer par nommer ce réseau : servers-net. Cochez la case "Créer un sous-réseau" avant de passer à la suite pour créer le sous-réseau dans la foulée, via les onglets correspondants.
Basculez sur l'onglet "Sous-réseau" afin d'indiquer le nom du réseau et l'adresse du réseau : adresse IP + masque de sous-réseau. Ici, nous utilisons l'IPv4, mais nous pourrions utiliser l'IPv6.
Nom du sous-réseau : servers-net-windows
Adresse réseau : 10.10.10.0/24
Adresse IP de la passerelle : 10.10.10.1
Le dernier onglet, nommé "Détails du sous-réseau" est tout aussi important. En effet, nous pouvons activer ou désactiver le service DHCP sur ce sous-réseau. Dans cette démonstration basée sur Windows Server, nous allons attribuer une adresse IP statique à notre instance, donc nous pourrions avoir envie de désactiver ce service. Pourtant, nous devons bien cocher l'option "Activer DHCP" sinon l'instance ne pourra pas être déployée correctement (il manquera une route réseau, ce qui posera problème pour stocker le mot de passe de l'instance).
En complément, nous pouvons indiquer le(s) serveur(s) DNS de notre choix pour la résolution des noms. Cliquez sur "Créer" pour valider.
Voilà, vous venez de créer un réseau et un sous-réseau dans OpenStack.
C. OpenStack : créer un port
La seconde étape consiste à créer un port dans notre réseau afin de lui associer une adresse IP statique. Elle sera affectée à notre future instance, ce qui nous assure que l'instance aura toujours la même adresse IP.
Dans la section "Réseaux", cliquez sur le nom du réseau "servers-net", basculez sur l'onglet "Ports" et cliquez sur "Créer un port".
Donnez un nom à ce port, par exemple "VM-WS-2022-01", ce qui fait référence à ma future instance. Choisissez "Adresse IP fixe" et précisez l'adresse IP fixe. Par exemple : 10.10.10.2. L'association entre le port et l'instance sera effectué par la suite. Cliquez sur "Créer".
D. OpenStack : créer et configurer un routeur
Vous venez de créer un réseau, mais ce dernier est isolé. Nous avons besoin que notre future instance puisse accéder à Internet. Nous allons créer un routeur pour mettre en place cette connectivité vers le monde extérieur. Sous "Réseau", cliquez sur "Routeurs" puis "Créer un routeur".
Nommez ce routeur, par exemple "servers-net-router", choisissez le réseau externe "ext-floating1" et validez.
Grâce à cette action, vous venez de créer un routeur connecté à Internet, mais sans aucun lien avec votre sous-réseau personnalisé (servers-net-windows). Pour cela, vous pouvez ajouter une interface en cliquant sur le routeur ou à partir de la vue topologie en cliquant sur le bouton "Ajouter une interface".
Choisissez votre sous-réseau, correspondant à "10.10.10.0/24". Il n'est pas nécessaire de préciser une adresse IP de passerelle, puisque nous l'avons déjà déclarée dans notre sous-réseau (10.10.10.1/24). Cliquez sur "Envoyer".
Voilà, l'aperçu "Topologie" montre bien notre routeur qui fait le lien entre deux réseaux : ext-floating1 et servers-net.
Passons à la suite de la configuration.
E. OpenStack : créer un groupe de sécurité
Vous devez créer un groupe de sécurité pour gérer les flux entrants et sortants à destination de votre instance. Un groupe de sécurité sert à créer des règles d'autorisation de flux en partant du principe que tout ce qui n'est pas autorisé sera refusé.
Par défaut, il y a le groupe de sécurité "default" qui bloque tous les flux entrants et autorise tous les flux sortants. Vous allez créer votre security group personnalisé en cliquant sur le bouton "Créer un groupe de sécurité" présente sous "Réseau" puis "Groupes de sécurité".
Nommez ce groupe de sécurité, par exemple "servers-net-sg".
Vous pouvez constater la présence des deux règles par défaut pour autoriser tous les flux sortants. Vous devez ajouter au moins une règle de flux entrant pour autoriser le protocole RDP vers votre instance afin de pouvoir vous connecter en Bureau à distance à Windows Server.
Cliquez sur "Ajouter une règle".
Renseignez les différents champs du formulaire pour autoriser le port 3389/TCP en entrée, puisqu'il correspond au RDP. Vous pouvez jouer sur les paramètres "Distant" et "CIDR" pour autoriser une adresse IP source spécifique (ceci peut s'avérer utile pour éviter de trop exposer le port RDP). Cliquez sur "Ajouter".
La règle est bien présente :
Vous pouvez passer à la suite !
F. OpenStack : associer une adresse IP flottante à un port
Dernière étape avant la création de l'instance : vous devez associer une adresse IP flottante au port qui va être utilisé par votre instance. Ainsi, elle va bénéficier d'une adresse IP publique !
Sous "Réseau", cliquez sur "IP flottantes", puis cliquez sur "Allouer une adresse IP au projet".
Choisissez le pool "ext-floating1" et cliquez sur "Allocation d'IP". Nous pouvons définir un nom de domaine DNS, si besoin.
Ensuite, vous devez associer à l'adresse IP flottante. En l'occurrence, l'adresse IP publique doit être associée à l'adresse IP "10.10.10.2" qui sera utilisée par notre future instance Windows Server. Sans cela, l'accès direct à notre instance depuis Internet sera impossible. Cliquez sur "Associer" pour valider.
Nous allons pouvoir créer notre instance Windows Server !
G. OpenStack : créer l'instance Windows Server
Pour créer une ou plusieurs instances, que ce soit sous Linux, Windows Server ou un autre système, à partir de l'interface web, vous devez cliquer sur "Compute", puis "Instances" afin d'accéder au bouton "Lancer une instance".
Un assistant s'ouvre... Nous allons devoir y aller étape par étape.
L'étape "Détails" sert à spécifier le nom de l'instance et la zone de disponibilité (redondance géographique). Nous pouvons aussi décider de déployer plusieurs instances.
Quelle est la source pour cette nouvelle instance ? Il pourrait s'agir d'un instantané d'une instance existante, mais dans le cas présent, nous partons de zéro. Nous allons sélectionner une image : vous pouvez sélectionner l'image de votre choix dans le catalogue d'Infomaniak. A ce jour, il y a 33 images différentes. Sélectionnez : "Windows Server 2022 Standard".
Remarque : vous pouvez importer vos propres images personnalisées. Différentes sources sont prises en charge : ISO, VDI, VHD, VMDK, etc.
L'étape "Gabarit" se présente à vous. L'objectif étant de choisir un modèle de machine virtuelle (ou flavor pour reprendre le terme OpenStack) qui correspond à vos besoins, notamment en termes de vCPU (processeur), RAM, et capacité de disque. Vous pouvez personnaliser l'espace de stockage pour ajouter un volume avec une taille spécifique.
Par exemple, vous pouvez prendre le modèle "a2-ram4-disk80-perf1" pour avoir 2 vCPU, 4 Go de RAM et 80 Go d'espace disque. Ceci me semble cohérent pour démarrer un Windows Server (disons, que c'est le minimal).
Passez l'étape "Réseaux" puisque vous devez associer directement un port réseau à l'étape "Ports réseaux". Il n'y a pas d'intérêt à associer l'instance aux deux à la fois. Ici, avec le bouton qui contient une flèche vers le haut, vous allez sélectionner le port "VM-WS-2022-01" créé précédemment. Pour rappel, ce port correspond à l'adresse IP "10.10.10.2" sur le sous-réseau "servers-net-windows".
Passez à l'étape "Groupes de sécurité". Ici, vous allez associer à l'instance le groupe de sécurité "servers-net-sg" créé préalablement. Une autre méthode consisterait à associer le groupe de sécurité au port, ainsi l'instance pourrait en hériter.
Poursuivez.
L'étape "Key Pair" s'affiche. Ici, vous devez "Créer une paire de clés" SSH. Avec une instance Linux, cette clé sert à sécuriser la connexion SSH vers votre instance pour que l'authentification soit effectuée à l'aide de votre clé privée. Avec Windows Server, l'authentification s'effectue avec un identifiant et un mot de passe. Toutefois, cette paire de clés sert à sécuriser le processus de récupération du mot de passe par défaut : si vous n'avez pas la clé privée, vous ne pouvez pas lire le mot de passe.
Nommez cette paire de clés et cliquez sur le bouton "Créer une paire de clés".
Une paire de clés (clé publique + clé privée) sera générée. Vous devez copier la chaine correspondante à la clé privée afin de la stocker en lien sûr (dans votre gestionnaire de mots de passe, par exemple). Elle sera utile par la suite.
Poursuivez... L'étape "Configuration" sert à préciser le contenu d'un script de personnalisation de Cloud-Init (pour Linux), ce qui peut permettre d'automatiser la configuration de l'instance, en post-déploiement.
Poursuivez jusqu'à la fin en prenant connaissance des dernières étapes puis cliquez sur "Lancer Instance".
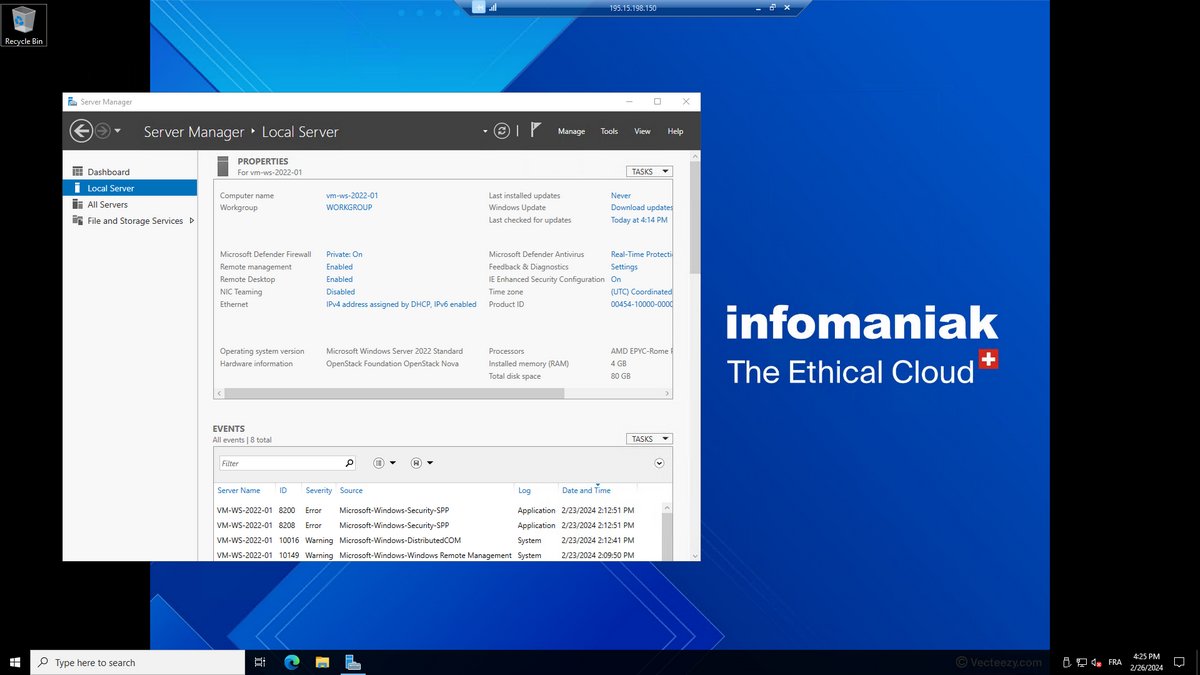
Ensuite, vous devez patienter pendant le déploiement de l'instance. Quelques minutes vont suffire. Pour suivre de plus près le déploiement, vous pouvez cliquer sur le nom de l'instance pour ensuite cliquer sur l'onglet "Console" afin de visualiser la console de la VM.
Quand le déploiement sera terminé, vous pourrez visualiser l'écran de verrouillage de Windows Server :
Comment se connecter à l'instance ? C'est ce que nous allons voir dans la prochaine partie !
H. OpenStack : se connecter à l'instance Windows Server
Pour établir la connexion à cette instance Windows Server, nous devons utiliser le protocole RDP. À partir d'une machine Windows, le client Bureau à distance peut être utilisé. Mais, quelle est l'adresse IP ? Quel est le nom d'utilisateur ? Et le mot de passe ?
L'adresse IP, vous la connaissez puisqu'il s'agit de l'adresse IP publique correspondante à l'adresse IP flottante rattachée au port de l'instance.
Le nom d'utilisateur est le suivant : Administrator
Pour le moment, quelques manipulations sont requises.
À partir de la liste des instances, cliquez sur la flèche au bout de la ligne de l'instance Windows Server, puis cliquez sur "Récupérer le mot de passe". D'ailleurs, ce menu donne accès à de nombreuses actions : prendre un instantané (snapshot), arrêter l'instance, redémarrer l'instance, etc.... Pour faire des économies, vous pouvez arrêter l'instance quand vous ne l'utilisez pas (chaque heure étant facturée).
Une fenêtre s'ouvre. Vous devez coller votre clé privée (vous savez, celle générée précédemment) ou charger le fichier de clé privée. Puis cliquez sur "Déchiffrer le mot de passe". Et là, le précieux sésame s'affiche au sein du champ "Mot de passe". Vous n'avez plus qu'à le copier. Vous l'aurez compris : pas de clé privé, pas de mot de passe. Pas de bras, pas de chocolat, finalement.
Vous n'avez plus qu'à ouvrir le client RDP sur votre PC ! Indiquez l'adresse IP publique, puis le nom d'utilisateur et le mot de passe afin de vous connecter.
Quelques secondes plus tard, vous êtes connecté à votre instance Windows Server 2022 !
La suite des opérations vous appartient : installation d'applications, de rôles Windows Server, etc... En fonction de vos besoins ou des tests que vous souhaitez effectuer.
V. Conclusion
En suivant ce tutoriel, vous devriez être en mesure de faire vos premiers pas avec l'offre IaaS Public Cloud d'Infomaniak dans le but de déployer une VM sous Windows Server 2022 Standard ! Vous pouvez même déployer une distribution Linux si vous le souhaitez, car finalement, à part pour se connecter à l'instance suite à la création, le processus reste le même !
Envie de tester le Cloud Public Infomaniak ? Vous pouvez utiliser ce lien.
Souhaitez-vous en savoir plus sur le Cloud Public Infomaniak ? N'hésitez pas à commenter cet article pour évoquer vos idées, poser vos questions, etc.
Join Canonical, the publishers of Ubuntu, as we proudly return as a gold sponsor at KubeCon + CloudNativeCon EU 2024. Hosted by the Cloud Native Computing Foundation, the conference unites adopters and technologists from top open source and cloud-native communities. Mark your calendars for March 20-22, 2024, as we gather in Paris for this exciting event.
Canonical, the publisher of Ubuntu, provides open source security, support and services. Our portfolio covers critical systems, from the smallest devices to the largest clouds, from the kernel to containers, from databases to AI. With customers that include top tech brands, emerging startups, governments and home users, Canonical delivers trusted open source for everyone.
Engaging with cloud-native enthusiasts and open source communities is a cornerstone of our mission. We’re excited to connect with attendees at KubeCon EU to share insights, foster collaboration, and contribute to this vibrant ecosystem.
Future-proof your infrastructure with the Canonical team at KubeCon EU
Build applications with ultra-small and secure containerisation that works on any infrastructure
Ubuntu containers are designed for modern software deployment. Our container portfolio ranges from an ecosystem of base OCI images, ultra-optimised chiselled container images to our long-term supported Docker images .
While building applications, developers can rely on Ubuntu’s seamless containerisation experience from development to production, while getting timely updates, security patches and long term support with a consistent, predictable lifecycle and support commitment.
Chiselled Ubuntu is where ultra-small meets ultra-secure. Developers can keep building with Ubuntu and rely on Chisel to extract an ultra-small, bitwise identical image tailored for production. No more worries about library incompatibilities, just seamless development to deployment.
Deploy and orchestrate your containers with the same Kubernetes: from your laptop through the cloud to the data centre
At Canonical, our aim is to streamline Kubernetes cluster management by removing unnecessary manual tasks. Be it the developer workstation, the data centre, the cloud or an IoT device- deploying applications on Kubernetes should not be a different experience just because the infrastructure changes.
MicroK8s is a lightweight Kubernetes distribution that enables you to run enterprise-grade Kubernetes on your laptop, Raspberry Pi, or in any public cloud while consuming minimal resources. MicroK8s applies security updates automatically by default, and rolls them back on failure.
That’s not all. We understand how maintaining Kubernetes upgrades can extract a toll on development efficiency. With MicroK8s you can upgrade to a newer version of Kubernetes in a single command.
Get your infrastructure ready for GenAI workloads
The Linux Foundation recently published a report that confirms that almost half the organisations prefer open source solutions for GenAI initiatives. Open source enables organisations to iterate faster and accelerates project delivery, by taking away the burden of licensing and tool accessibility. Yet, GenAI comes with several challenges, such as the need for extensive compute resources and associated costs . To optimise the use of their compute resources, organisations need efficient and scalable AI infrastructure, from bare metal to Kubernetes to their MLOps platforms. Our Kubeflow distribution, Charmed Kubeflow, is designed to run on any infrastructure, enabling you to take your models to production in the environment that best suits your needs.
Canonical also works with leading silicon vendors like NVIDIA to optimise its open source solutions for AI infrastructure and enable efficient resource utilisation. This is especially relevant for large-scale deployments, where a large number of GPUs live under the same cluster.
Increasing GPU utilisation on K8s clusters for AI/ML workloads
Join Maciej Mazur’s keynote at KubeCon EU on 22 March, to see how all layers of the stack can be optimised for AI/ML workloads. The ratio increase of GPU sharing in the open source world will be the subject of his talk. During the talk, Maciej will cover some pitfalls, best practices, and recommendations based on four projects of similar scale.
From the hardware layer, which benefits from networking capabilities such as NVIDIA MIG to Kubernetes schedulers such as Volcano, Maciej will go through different opportunities organisations have to optimise their infrastructure for AI workloads and scale their projects. MLOps platforms like Charmed Kubeflow go a level beyond and enable application layer optimisation. For instance, Charmed Kubeflow provides access to frameworks like PaddlePaddle, which distributes training jobs in a smarter way.
Deliver innovation at scale with reliable security patching and support
Whether you’re building new products or AI models, it’s crucial to ensure that the pace of innovation is not hindered by security vulnerabilities. That’s why Canonical’s open source solutions come with reliable security maintenance, so you can consume the open source you need at speed, securely.
Meet our team to learn more about Ubuntu Pro, our comprehensive subscription for open source software security. With Ubuntu Pro organisations reduce their average CVE exposure from 98 days to 1 day (on average). It enables development teams to focus on building and running innovative applications with complete peace of mind.
Join us at Booth E25
If you are attending KubeCon EU in Paris between 20-22 March, make sure to visit booth E25. Our team of open source experts will be available throughout the day to answer all your questions.
You can already book a meeting with our team member Teresa Lugnan using the link below.
Dans ce tutoriel, je vais vous expliquer comment configurer l’authentifications SAML avec ADFS et Nextcloud. Dans un tutoriel précédent, j’avais traiter l’authentification de Nextcloud avec l’Active Directory directement, ici nous allons obtenir le « même » résultat mais cette fois ci avec ADFS. L’avantage d’utiliser ADFS est multiple : Installation de l’application SSO & SAML authentification Pour ...
In December 2023, Canonical joined the Sylva project of Linux Foundation Europe to provide fully open-source and upstream telco platform solutions to the project. Sylva aims to tackle the fragmentation in telco cloud technologies and the vendor lock-in caused by proprietary platform solutions, by defining a common validation software framework for telco core and edge clouds. This framework captures the latest set of technical requirements from operators when running telco software workloads as cloud native functions (CNF), such as 5G core microservices and Open RAN software.
Sylva’s mission is to support 5G actors in their efforts to drive convergence of cloud technologies in the telco industry – taking into account interoperability across 5G components, TCO with open source software, compliance with regulations and adherence to high security standards. CNFs from vendor companies can then be operated and validated on reference implementations of the cloud software framework defined by Sylva.
To test and validate telco vendor CNFs, Sylva has deployed cloud-native platforms based on a multi-deployment model as Kubernetes (K8s) clusters on bare metal or OpenStack. These CNFs often require telco-grade enhanced platform features like SR-IOV, DPDK, NUMA, and Hugepages, along with support for a range of container networking interfaces (CNI). In this blog, we explain how Canonical’s Sylva-compliant infrastructure solutions satisfy these requirements.
Canonical’s open source platform solutions for Sylva
Canonical’s product portfolio is closely aligned with Sylva’s objectives and strategies. It provides a variety of features that Sylva aims to include in the latest modern telecom infrastructure deployments. The project has already deployed validation platforms running on Ubuntu, and also leverages hardened Ubuntu 22.04 images.
Canonical Kubernetes is a CNCF conformant enterprise-grade Kubernetes with high-availability. It delivers the latest pure upstream Kubernetes, which has been fully tested across a variety of cloud platforms of all form factors, including provisioned bare metal systems, Equinix Metal and OpenStack, and architectures including x86, ARM, IBM POWER and IBM Z. It supports the Cluster API (CAPI), which is mandated by Sylva to provision Kubernetes. With CAPI, an operator can update Kubernetes clusters through rolling upgrades without disruption and initialise their workloads.
For telco edge clouds, Canonical Kubernetes can scale as a lightweight Kubernetes solution with self-healing, high-availability and easy clustering properties. This provides a minimal footprint for more energy-efficient operations at edge clouds. It can equivalently scale up at regional and central clouds where a larger footprint is needed in a data centre.
Based on Canonical Kubernetes, Canonical’s Cloud Native Execution Platform (CNEP) aligns with the Sylva platform features and architectural design. With CNEP, Kubernetes clusters are offered to telco operators on bare metal hardware, where hardware provisioning and cluster operations can both be controlled and orchestrated via Cluster API centrally.
CNEP’s set of supported features makes it ideal for operators who want to adopt a Sylva compliant platform with validated telco CNFs from vendors, e.g. 5G core and Open RAN as well as MEC CNFs, such as content delivery networking (CDN) software. The platform software stack fully supports the Sylva design from bare metal to containers, with capabilities including:
Bare metal provisioning operations automated via Cluster API
Enhanced platform awareness features, such as SR-IOV, DPDK, CPU pinning, Hugepages and NUMA
Ubuntu operating system with CIS security hardening, compliant with FIPS, NIST 800-53, PCI DSS, DISA STIG, ISO 270001 standards
A real-time kernel for mission-critical applications and latency-sensitive telco workloads, such as Open RAN DU and 5G UPF
Fully upstream and CNCF-compliant Canonical Kubernetes that provides operators with an industry-standard and production-grade Kubernetes container orchestration platform with multi-tenancy features, exposing Cluster API
A wide range of CNIs, required by vendor CNFs and the Sylva validation framework, such as Cilium, Calico, Multus, and others
Ceph as a backbone for distributed multi-tenant storage with configurable data protection and encryption
Full observability, with support for the Canonical Observability Stack, consisting of popular open source software tools Grafana, Prometheus, and Loki, supporting logging, monitoring and alerting
Role based access control (RBAC) features at platform, Kubernetes and bare metal provisioning levels
In addition to Canonical Kubernetes and our CNEP solution, Canonical OpenStack supports the advanced platform features that Sylva validation platforms need, including SR-IOV, DPDK, CPU-pinning, NUMA, Hugepages, PCI passthrough, and NVIDIA GPUs with virtualisation. It has native support for both Ceph and Cinder as storage components, both of which are included in the Sylva platform design and roadmap.
About the Sylva project
Aligned with telco operator needs, Sylva envisions cloud-native telco software execution on Kubernetes platforms. Operators look to deploy Kubernetes clusters at their telco edge, regional and core clouds, providing them with a uniform cloud-native execution environment.
Modern telco infrastructure is distributed, deployed across multiple locations with tens of thousands of far-edge clouds, thousands of near-edge clouds and tens of regional clouds. This calls for deploying and managing a large number of Kubernetes workload clusters at geographically dispersed locations, controlled by management cluster(s) located at regional and central clouds. To tackle this challenge, Sylva has defined a software framework for telecom software platforms based on Kubernetes that are deployed on a large scale.
Modern telco clouds must also support a set of enhanced platform features often required by telco CNFs. Towards this, the project’s validation platforms verify that (i) the deployment platform supports the requirements of a CNF in test, and (ii) the CNF can correctly deploy on the platform and successfully consume these platform features.
Kubernetes cluster management
Sylva follows a declarative approach with a GitOps framework to manage a high volume of physical nodes and Kubernetes clusters. Infrastructure lifecycle management covers Day 0 (build and deploy), Day 1(run), Day 2(operate) operations, with fault management, updates and upgrades. The project provides automation with CI/CD pipelines where a set of scripts produce and maintain Helm charts that include Kubernetes deployment and operational resource definitions.
A dedicated work group, called Telco Cloud Stack, has developed tooling for cluster deployment and lifecycle management (LCM). This tooling is based on the Flux GitOps tool, which keeps clusters and infrastructure components in sync with their definitions in Git repositories.
To manage the Kubernetes clusters and bare metal provisioning with this tool-chain, Sylva leverages Cluster API (CAPI).
Validation of telco CNFs on Sylva platforms
CNFs from different vendors are validated on Sylva platforms for the interoperability between the CNFs and the platforms. The project’s validation program ensures that telco operators who deploy platforms with software components that follow the Sylva reference implementations gain two benefits: (i) verified telco CNF functionality on their cloud platforms, and (ii) verified support for the telco-grade platform features which these CNFs require.
The project has a dedicated work group called the Sylva Validation Center, which tests deployment of vendor CNFs on the project’s validation platforms, where Kubernetes runs on either bare metal hardware or on OpenStack.
The validation of a CNF under test on a Sylva platform starts with identifying the necessary set of platform capabilities that the CNF requires, including CNIs, and then installing and configuring the platform with those capabilities. Once the platform has been configured, a first set of smoke tests are run to verify the platform’s support for this set of features. Once the CNF has been deployed on the platform, some functional tests are performed to verify that the deployment is correctly done, and all the necessary Kubernetes pods are healthy in ready state. Finally, operators may run additional tests on CNFs if deemed necessary.
Canonical’s open source software and solutions meet the platform feature requirements by telco CNFs as tested by the Sylva Validation Center, such as SR-IOV, Multus CNI, and Real-time Linux. Validating telco CNFs on Canonical’s platforms for Sylva will also ensure that our platforms with support for these advanced features are verified by Sylva to run these CNFs.
Sylva platform roadmap
In its roadmap for 2024, project Sylva is planning to add support for new features in its validation platforms, such as near real-time Linux, immutable operating system for far-edge clouds and GPU offloads. Canonical’s software platforms follow Sylva’s vision and have support for these features already today, with Real-time Ubuntu, Ubuntu Core immutable OS, support for precision time protocol (PTP) and more.
Canonical is committed to making Sylva a benchmark platform for executing telco network functions. This commitment entails Canonical’s contribution to the infrastructure-as-code scripts that compose Sylva, to enable our open source solutions for Sylva, and to align with the evolving technical scope of the project.
Summary
Linux Foundation Europe’s Sylva project has defined a platform architecture for validating cloud-native telco network functions on Kubernetes. This provides telco operators with guidance on how to achieve a uniform cloud infrastructure, covering edge, regional and central cloud locations, ultimately aiming at multiple objectives, including cost reduction, interoperability, automation, compliance and security.
The project emphasises the central role of open source platforms with standard and open APIs, which brings a modular approach when designing and deploying telco cloud systems.
Canonical offers fully upstream and telco-grade open source solutions that align with the Sylva platform architecture, including Canonical Kubernetes and Canonical OpenStack. We also engineered an innovative platform solution, CNEP, which is fully inline with the Sylva visions on multi-tenancy, multi-site Kubernetes clusters, bare metal with full automation of hardware provisioning and cluster lifecycle management performed over industry-standard Cluster API.
Contact us
Canonical provides a full stack for your telecom infrastructure. To learn more about our telco solutions, visit our webpage at ubuntu.com/telco.
Think open source – the world’s leading software portfolio. Open-source software enables you to build fully functional virtualisation and cloud infrastructure while ensuring total cost of ownership (TCO) reduction and business continuity. In this blog, we will walk you through the open source ecosystem. We will help you understand how it differs from other VMware alternatives by answering five common questions.
What is open source?
Open source is a generic term for any software released under a licence that allows its unlimited redistribution and modification. It is available for everyone, people can use it free of charge, and everyone can contribute to its development. Unlike VMware software or its proprietary alternatives, there is no single entity that owns open source. Instead, it is usually created under the governance of independent foundations. Those associate individuals, universities, research institutions and large enterprises from various parts of the world.
So you can think of open source as a collection of software meeting those criteria. There is no single place where this “collection” is hosted, however. Open-source software is distributed across numerous code repositories on GitHub, SourceForge, Launchpad, etc. Fortunately, leading Linux distributions provide streamlined access to this software. By making applications and infrastructure components available in the form of software packages, they serve as open source integration platforms.
Ubuntu, published by Canonical, is the world’s leading open source integration platform Preferred by 66% of developers and endorsed by executives, Ubuntu powers one-third of all Linux-based web servers worldwide and its market share in the infrastructure space constantly increases. Ubuntu provides immediate access to tens of thousands of software packages and ensures a human-friendly interface to install and use open source.
Why open source over other VMware alternatives?
So obviously, open-source solutions are just one of the available VMware alternatives. Several proprietary solutions exist too. These include leading public clouds, premium versions of Proxmox Virtual Environment (VE), Citrix Hypervisor, Hyper-V, etc. What makes open source better, then?
In short, the benefits of open source can be summarised in the following five bullet points:
TCO reduction – since open-source software does not require attaching any expensive licences, standardising on open source leads to significant cost savings over time.
No vendor lock-in – with open source, you are no longer dependent on a single vendor; the software is developed by the entire community, consisting of thousands of developers.
Innovation advances – the development pace of open-source software is way higher than for proprietary software companies, which helps you to stay at the forefront of the technology.
Higher software quality – open-source software usually passes through a rigorous software development process which results in higher quality and better security.
Community collaboration – since billions of people worldwide use open source daily, enterprises can benefit from fantastic community collaboration through numerous industry conferences, technical forums, knowledge bases, etc.
No wonder open source is becoming the new standard. And this trend will only intensify in the following years.
Is open source suitable for enterprises?
Yes, it is. There is no reason why it wouldn’t be. All of the benefits mentioned above speak in favour of open source.
However, enterprises need not just software but all types of commercial services around it. For example, companies might not have enough time to experiment with the software. They would rather hire external consultants to deploy IT systems for them so that they could start using them immediately. Or they cannot rely solely on community support if their business applications are expected to run 24/7.
Canonical understands those challenges and provides a complete package of optional commercial services for businesses willing to adopt open source on Ubuntu. This includes design and delivery services for open-source solutions, enterprise support, fully-managed services for both infrastructure and application, and comprehensive training courses. By partnering with Canonical, enterprises can rest assured that their migration to open source will be hassle-free and stressless.
Unlike VMware or its proprietary alternatives, there is no single open-source monolith that provides all the capabilities in a single place. Instead, several independent components exist that, added together, can serve as a cloud.
Think of it through an analogy to Lego. Let’s say that you want to build a car with Lego. There are many pieces in the box. Each piece doesn’t look like a car. However, when you start mounting them together, you will quickly see an engine, wheels, seats, etc. And even more importantly, you can choose to build a Coupe, Sedan, SUV or even a track! A car that you designed according to your needs.
The same applies when building cloud infrastructure with open source. By using various independent software components, you can build a simple virtualisation environment, an ordinary Infrastructure-as-a-Service (IaaS) cloud, a Container-as-a-Service (CaaS) cloud or even a Software-as-a-Service (SaaS) platform. Then you can extend its functionality with live migration capabilities, automated power management, observability, etc. to ensure feature parity with your existing VMware infrastructure.
How to move to open source?
Preferably by a trusted partner. Canonical provides free access to all necessary open-source components that will help you to build cloud infrastructure tailored to your needs. Moreover, the most demanding organisations can leverage Canonical’s professional services, which include analysis of existing workloads, designing the right migration strategy to avoid service downtimes and ensure business continuity, etc.
The migration away from VMware is not a trivial task. No one claims it is. However, by choosing open source over other VMware alternatives and by standardising on the right open source integration platform, you can be assured that your migration is not only going to be painless but also that your organisation will see long-term benefits, such as increased innovation and TCO reduction.
“云计算不仅仅关乎技术,它还是一切现代工业转型中推动敏捷性和创新的灵魂部分。我们的使命是为客户提供最有效的创新途径并创造价值;拥有一个无复杂性的云基础架构是这一难题的一个重要组成部分。有了 MicroCloud,即可将问题重点由云运营转移到解决真正的业务挑战。”Spindox 架构与技术主管 Juan Manuel Ventura 道。
In the fast-paced world of technology, innovation is the key to staying ahead of the curve. As businesses strive for efficiency, speed, and real-time data processing, the spotlight is increasingly turning towards edge computing.
Edge computing represents a paradigm shift in the way data is processed and analysed. Unlike traditional cloud computing, which centralises data processing in distant data centres, edge computing brings the processing power closer to the source of data. This not only reduces latency but also opens up a world of possibilities for industries across the board.
In this blog, we’re excited to explore examples of this cutting-edge technology, with its diverse applications and use cases, with a special focus on how Canonical’s MicroCloud fits seamlessly into this transformative landscape.
Edge computing examples across industries
Smart cities and urban planning
Edge computing plays a pivotal role in the development of smart cities. By deploying edge devices such as sensors and cameras throughout urban environments, data can be processed locally to optimise traffic management, enhance public safety, and improve overall city infrastructure. Real-time analytics at the edge enable swift decision-making, leading to more efficient and responsive urban systems.
Healthcare and remote patient monitoring
The healthcare sector is leveraging edge computing to enhance patient care and streamline medical processes. Edge devices in healthcare facilities enable real-time monitoring of patients, ensuring timely intervention and reducing the need for extensive data transfer to centralised servers. In remote areas, edge computing facilitates telemedicine, providing access to healthcare services for those in underserved communities.
Industrial IoT for predictive maintenance
Edge computing is revolutionising industrial operations by enabling predictive maintenance through the Internet of Things (IoT). In manufacturing environments, sensors attached to machinery collect and analyse data locally. This allows for early detection of potential issues, minimising downtime and optimising maintenance schedules. The result is increased efficiency, reduced costs, and improved overall equipment effectiveness.
Autonomous vehicles and enhanced safety
The automotive industry is embracing edge computing to power autonomous vehicles and enhance road safety. Edge devices onboard vehicles process data from numerous sensors, cameras, and lidar in real-time, enabling quick decision-making without relying on distant cloud servers. This low-latency approach is critical for the success and safety of autonomous driving systems.
Retail and personalised customer experiences
Edge computing transforms the retail experience by enabling personalised services and improving customer engagement. In-store cameras and sensors analyse customer behaviour, allowing retailers to offer targeted promotions and optimise inventory management. This real-time data processing at the edge enhances customer satisfaction and creates a more seamless shopping experience.
MicroCloud: a tailored solution for edge computing
In the dynamic landscape of edge computing, choosing the right solution is paramount. Canonical’s MicroCloud emerges as an ideal edge cloud solution, seamlessly aligning with the diverse edge computing examples presented. Offering a compact and efficient cloud infrastructure, MicroCloud is designed to deliver edge computing capabilities with a focus on simplicity, scalability, and reliability.
Key Features of MicroCloud
Compact Form Factor: MicroCloud’s compact form factor makes it suitable for deployment in diverse environments, from industrial settings to urban landscapes, ensuring that edge computing resources are readily available where they are needed the most.
Scalability: MicroCloud allows for easy scalability, accommodating the varying demands of edge computing applications. Whether it’s in a smart city deployment or an industrial automation setting, MicroCloud can scale to meet the evolving needs of the edge.
Reliability and Security: With a robust architecture, MicroCloud ensures the reliability and security of edge computing operations. Its design aligns with the stringent data security requirements of industries such as healthcare and telecommunications, providing a trustworthy foundation for critical applications.
A consolidated snapshot of key edge computing examples and trends
To delve deeper into the world of edge computing and its dynamic use cases, read more in our whitepaper, “Edge computing use cases across industries”. This whitepaper explores real-world examples, industry-specific applications, and the potential impact of edge computing on businesses and society.
As we navigate the ever-evolving technological landscape, understanding the practical applications of edge computing is crucial for businesses aiming to stay ahead. This whitepaper serves as a valuable resource for those seeking to harness the power of edge computing and unlock new possibilities in their respective industries.