Generative AI with Ubuntu on AWS. Part II: Text generation
In our previous post, we discussed how to generate Images using Stable Diffusion on AWS. In this post, we will guide you through running LLMs for text generation in your own environment with a GPU-based instance in simple steps, empowering you to create your own solutions.
Text generation, a trending focus in generative AI, facilitates a broad spectrum of language tasks beyond simple question answering. These tasks include content extraction, summary generation, sentiment analysis, text enhancement (including spelling and grammar correction), code generation, and the creation of intelligent applications like chatbots and assistants.
In this tutorial, we will demonstrate how to deploy two prominent large language models (LLM) on a GPU-based EC2 instance on AWS (G4dn) using Ollama, an open source tool for downloading, managing, and serving LLM models. Before getting started, ensure you have completed our technical guide for installing NVIDIA drivers with CUDA on a G4DN instance.
We will utilize Llama2 and Mistral, both strong contenders in the LLM space with open source licenses suitable for this demo.
While we won’t explore the technical details of these models, it is worth noting that Mistral has shown impressive results despite its relatively small size (7 billion parameters fitting into an 8GB VRAM GPU). Conversely, Llama2 provides a range of models for various tasks, all available under open source licenses, making it well-suited for this tutorial.
To experiment with question-answer models similar to ChatGPT, we will utilize the fine-tuned versions optimized for chat or instruction (Mistral-instruct and Llama2-chat), as the base models are primarily designed for text completion.
Let’s get started!
Step 1: Installing Ollama
To begin, open an SSH session to your G4DN server and verify the presence of NVIDIA drivers and CUDA by running:
nvidia-smiKeep in mind that you need to have the SSH port open, the key-pair created or assigned to the machine during creation, the external IP of the machine, and software like ssh for Linux or PuTTY for Windows to connect to the server.
If the drivers are not installed, refer to our technical guide on installing NVIDIA drivers with CUDA on a G4DN instance.
Once you have confirmed the GPU drivers and CUDA are set up, proceed to install Ollama. You can opt for a quick installation using their binary, or choose to clone the repository for a manual installation.
To install Ollama quickly, run the following command
curl -fsSL https://ollama.com/install.sh | shStep 2: Running LLMs on Ollama
Let’s start with Mistral models and view the results by running:
ollama run mistralThis instruction will download the Mistral model (4.1GB) and serve it, providing a prompt for immediate interaction with the model.
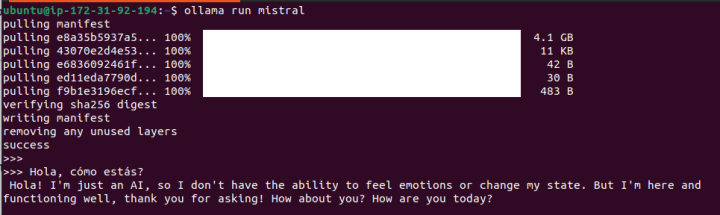
Not a bad response for a prompt written in Spanish!. Now let’s experiment with a prompt to write code:
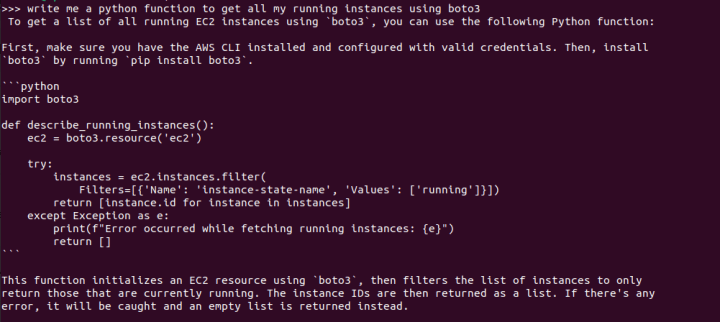
Impressive indeed. The response is not only generated rapidly, but the code also runs flawlessly, with basic error handling and explanations. (Here’s a pro tip: consider asking for code comments, docstrings, and even test functions to be incorporated into the code).
Exit with the /bye command.
Now, let’s enter the same prompt with Llama2.
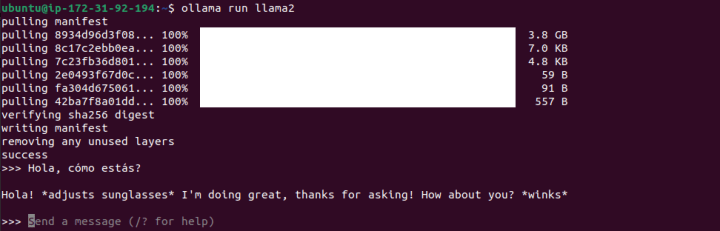
We can see that there are immediate, notable differences. This may be due to the training data it has encountered, as it defaulted to a playful and informal chat-style response.
Let’s try Llama2 using the same code prompt from above:
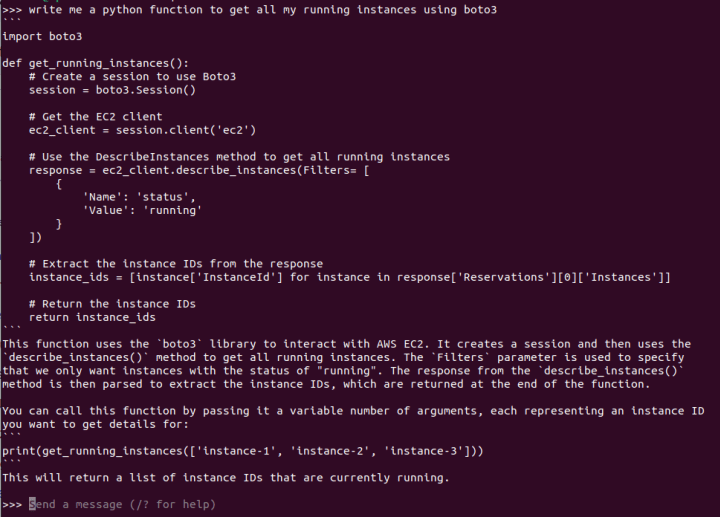
The results of this prompt are quite interesting. Following four separate tests, it was clear that the generated responses had not only broken code but also inconsistencies within the responses themselves. It appears that writing code is not one of the out-of-the-box capabilities of Llama2 in this variant (7b parameters, although there are also versions specialized in code like Code-Llama2), but results may vary.
Let’s run a final test with Code-Llama, a Llama model fine-tuned to create and explain code:

We will use the same prompt from above to write the code:
This time, the response is improved, with the code functioning properly and a satisfactory explanation provided.
You now have the option to either continue exploring directly through this interface or start developing apps using the API.
Final test: A chat-like web interface
We now have something ready for immediate use. However, for some added fun, let’s install a chat-like web interface to mimic the experience of ChatGPT.
For this test, we are going to use ollama-ui (https://github.com/ollama-ui/ollama-ui).
⚠︎ Please note that this project is no longer being maintained and users should transition to Open WebUI, but for the sake of simplicity, we are going to still use the Ollama-ui front-end.
In your terminal window, clone the ollama-ui repository by entering the following command:
git clone https://github.com/ollama-ui/ollama-uiHere’s a cool trick: when you run Ollama, it creates an API endpoint on port 11434. However, Ollama-ui will run and be accessible on port 8000, thus, we’ll need to ensure both ports are securely accessible from our machine.
Since we are currently running as a development service (without the security features and performance of a production web server), we will establish an SSH tunnel for both ports. This setup will enable us to access these ports exclusively from our local computer with encrypted communication (SSL).
To create the tunnel for both the web-ui and the model’s API, close your current SSH session and open a new one with the following command:
ssh -L 8000:localhost:8000 -L 11434:127.0.0.1:11434 -i myKeyPair.pem ubuntu@<Machine_IP>Once the tunnel is set up, navigate to the ollama-ui directory in a new terminal and run the following command:
cd ollama-ui
make
Next, open your local browser and go to 127.0.0.1:8000 to enjoy the chat web inRunning an LLM model for text generation on Ubuntu on AWS with a GPU instanceterface!
While the interface is simple, it enables dynamic model switching, supports multiple chat sessions, and facilitates interaction beyond reliance on the terminal (aside from tunneling). This offers an alternative method for testing the models and your prompts.
Final thoughts
Thanks to Ollama and how simple it is to install the NVIDIA drivers on a GPU-based instance, we got a very straightforward process for running LLMs for text generation in your own environment. Additionally, Ollama facilitates the creation of custom model versions and fine-tuning, which is invaluable for developing and testing LLM-based solutions.
When selecting the appropriate model for your specific use case, it is crucial to evaluate their capabilities based on architectures and the data they have been trained on. Be sure to explore fine-tuned variants such as Llama2 for code, as well as specialized versions tailored for generating Python code.
Lastly, for those aiming to develop production-ready applications, remember to review the model license and plan for scalability, as a single GPU server may not suffice for multiple concurrent users. You may want to explore Amazon Bedrock, which offers easy access to various versions of these models through a simple API call or Canonical MLOps, an end-to-end solution for training and running your own ML models.
Quick note regarding the model size
The size of the model significantly impacts the production of better results. A larger model is more capable of reproducing better content (since it has a greater capacity to “learn”). Additionally, larger models offer a larger attention window (for “understanding” the context of the question), and allow more tokens as input (your instructions) and output (the response)
As an example, Llama2 offers three main model sizes regarding the parameter number: 7, 13, or 70 billion parameters. The first model requires a GPU with a minimum of 8GB of GPU RAM, whereas the second requires a minimum of 16GB of VRAM.
Let me share a final example:
I will request the 7B parameters version of Llama2 to proofread an incorrect version of this simple Spanish phrase, “¿Hola, cómo estás?”, which translates to “Hi, how are you?” in English.
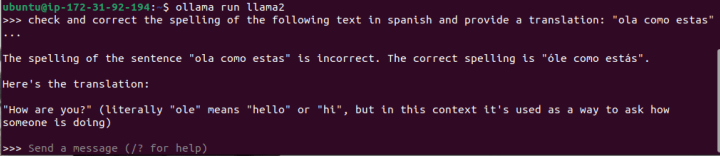
I conducted numerous tests, all yielding incorrect results like the one displayed in the screenshot (where “óle” is not a valid word, and it erroneously suggests it means “hello”).
Now, let’s test the same example with Llama2 with 13 billion parameters:
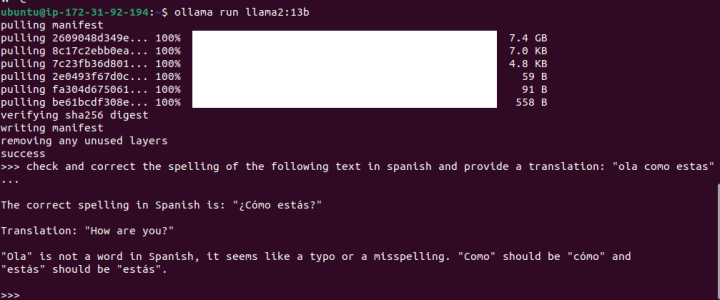
While it failed to recognize that I intended to write “hola,” this outcome is significantly better as it added accents, question marks and detected that “ola” wasn’t the right word to use (if you are curious, it means “wave”) .

